Knurls, Knurls, Knurls
- Torin Walker

- Sep 16, 2018
- 4 min read
For the longest time, I've been manufacturing tops with a stem diameter of 0.151 instead of the designed 0.150. When one first sets up all the tools in a lathe and begins cutting, one will find (esp when chasing tolerances into the tenths) that one must tweak one cutter or another so that two different cuts on thinner sections end up at the same diameter. Suffice it to say that once I adjusted everything, the stem ended up being 0.001" over, and I just left it that way. The tool that cuts the stem is also the same tool that cuts the knurl, so the knurl was also over by .001.
While setting up the new lathe, and not being able to leave well-enough alone, I decided to tweak it back to spec and in doing so caused the knurl tool to get out of whack. At 80 TPI, a .001" variation can make or break the knurl pattern, and that is exactly what it did.

Trying to get the Brown and Sharp 185-220 knurl die holder adjusted back to perfection proved difficult because as I would soon discover, the "swivel shoes" holding the dies at a specific angles and distance from center were either cracked or partially missing. When I adjusted one of them, the needle on the indicator started to move, but would stop midway through the adjustment even as I continued turning the set screw. Something was wrong. Despite trying many times, one knurl was always off by between .0005 and .001 resulting in mashed and twisted knurl patterns.
After disassembling the knurl holder, I discovered the fault - one was cracked and bent, and the other was missing an entire side of the shoe that normally keeps the swivel from moving vertically. No wonder it was making such a mess.

Calling up Brown and Sharp, I was able to easily reach their parts replacement rep and inquire about these shoes. I was told they'd be $20 USD apiece plus shipping, and would take a few weeks. I didn't have that kind of time and for such a simple part, I decided to make them myself.
These shoes are pressed against the swivel using a set-screw. I needed a material that wouldn't deform but not so brittle that it would crack. The rep wouldn't reveal the data on the print for this part, so I posted on a forum asking if 4140HT would be sufficient and a couple of guys nodded in agreement.
I have this great little shop nearby, Resource Metals (resourcemetals.ca) with equally great staff - Jason Bell, the guy who runs the joint, and Glen Koshien who mans the phones. I've been buying from them for years now. You'd be wise to make their acquaintance. A quick trip to Resource and I had two little off-cuts of rectangular 4140HT for under $20. I could have gotten away with just one piece for under $10, but I like having extra on hand for moments like these.

The parts I'd be making are very small and will be tricky to hold, so I decided to make them in one piece, then split them afterward. I kinda fumbled here though because what started out to be two pieces side-by-side along the long edge ended up being two pieces laid end-to-end instead. Instead of clamping them just below the little dogs, I ended up holding them sideways... this is harder to describe, so just have a look at the pictures.

Once the dogs were machined, I sawed off the piece with a bit of extra meat to hold in the vice.

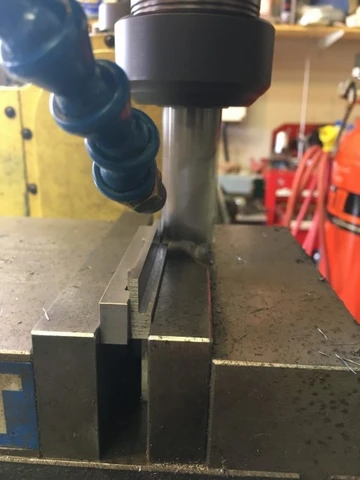
Next, I had to hold this in the vice so I machined a sacrificial mirror piece to enable clamping sideways in the vice.

Now with it held in the vice, I can mill both the bottom and side to bring it to final dimension. The lower part is the sacrificial part. After this, I'll flip it over in the vice and mill away the bottom which will bring the shoe width to spec.

This was a very tight fit. I think I had .02" left between the cutter and vice jaws when this was finished. As you can see, the sacrificial piece allowed me to get a better grip on the shoes rather than clamping the shoe by itself by its long edges. At 0.09" in height, there wasn't much to bite on. The height of these shoes were cut to 0.1" (about .006" ~ 0.008" taller than the originals which had different heights), so I could grind them down during fitting.

The dogs fit perfectly in the swivel shoe recess. I then cut them apart, deburred and chamfered all edges, then ground them to size to achieve a perfect slip-fit between the swivel and the tool body. I wanted them to hold the swivels tight so that when the set-screws were loose, the swivels would turn with just a bit of drag rather than spin freely.

Here's a shot after separating them, but before deburring/grinding. I didn't take any pictures after this - I got lost in the finishing process and forgot final shots.

The replacement shoes worked perfectly and allowed me to tune the knurls back to perfection. In the end, I saved $50, a whole lot of down time, and had some fun in the process.
Incidentally, my knurls are the straight type and must be turned at ~30 degrees to cut a diamond pattern. Literature provided by most knurl die manufacturers gives you equations that assume you can and will adjust the diameter of the material to get your knurls to track properly - that is, to get the teeth on the die to divide evenly into the circumference of your work. In my case, I preferred not to adjust the size of the work, but rather adjust the angle of the dies so to vary the distance between the grooves.

Adjusting the angle roughly 1.5 degrees more gives me an integer number of teeth for a fixed circumference of work. I'm posting the work here in case you, like me, have to work with a fixed material diameter.

As you can see, turning the die to 31.45 gives me a proper engagement of the teeth, and quite doable with a B&S protractor... just measure twice - once before, and once after tightening up on the swivel shoes to make sure they don't move.
If you have any questions about the above, feel free to contact me.
Until next time, keep spinning.
Torin...


Comments